Premedia Department is run by Interactivecolor Digital, Inc.
a COP Communications, Inc. company
Our premedia company is dedicated to delivering you the highest standards in publication and catalog digital services. We have years of computer-to-plate experience and our equipment is calibrated to Specifications for Web Offset Publication (SWOP) standards to produce optimum results.
Our team of system specialists are trained in the use of most of the application software in use today, including QuarkXPress, PageMaker, FrameMaker, Photoshop, Streamline, Illustrator, InDesign, Freehand and CorelDraw. Our expert preflight system utilizes Flightcheck software.
Phone 1-800-280-6446 EXT.#1182 and #1150
Fax ( 818 ) 547-4607
Choosing a company name is not an easy task.
It should not be too cute, too cliché, too serious. It should convey the concept of how the business will be run.
Interactive
Ink interacts with paper, chemicals interact to process film, and people interact with each other just like we plan to interact with you.
Color
The difference between good color and great color is how the eye interacts with the screen, how the machine interacts with the output devices. It takes skill, experience and commitment to make it work. We want to do more than that; we want to make it perfect – in your eyes, on the color proof, the printing press, and the Internet.
Interactive Color
Cross Media Production Specialists
Your partner in perfection
What is COP passport?
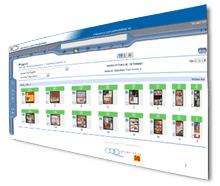
COP passport provides our customers with secure, controlled web access to their print jobs. It enables ICI and our customers to: upload and download jobs and job data; proof online with geographically dispersed users collaborating simultaneously; append annotations or comments; approve or reject pages; manage information; and access secure job status reporting over the Internet using a standard browser.

ICI customers log in online to see the status of their jobs, view a thumbnail of all pages in each job, make annotated comments, and even approve pages.
The CSR handling the print accounts has the ability to manage client information, add/remove participants, and receive optional e-mail notification for each change.
Up-to-the-minute information virtually anytime, anywhere.
COP passport provides our customers with secure, controlled web access to their print jobs. It enables ICI and our customers to: upload and download jobs and job data; proof online with geographically dispersed users collaborating simultaneously; append annotations or comments; approve or reject pages; manage information; and access secure job status reporting over the Internet using a standard browser.
ICI customers log in online to see the status of their jobs, view a thumbnail of all pages in each job, make annotated comments, and even approve pages.
The CSR handling the print accounts has the ability to manage client information, add/remove participants, and receive optional e-mail notification for each change.
Up-to-the-minute information virtually anytime, anywhere.
Click here to login
Click here to request login
Hard Copy
Hard Copy (Laser Proofs) must be supplied with your job. They should be printed out at 100% if possible, if not they should be marked as to the percentage they are printed. If no hard copy is provided California Offset Printers will run them for you for a nominal fee.
Fonts & Text Components
Fonts have two components, 1) the SCREEN font and 2) the PRINTER font. Each part is necessary to image your file. Be sure to send both your printer and screen fonts to us with your job, including any fonts used in illustration programs such as Illustrator and Freehand. Use only Type 1 or Adobe fonts. Do not use TrueType fonts. We do not support TrueType fonts. You should substitute them with Postscript Type 1 fonts. We cannot guarantee the output of TrueType fonts.
Do not Stylize Fonts! Many software programs allow you the option of highlighting a word and applying italics, bold, outline or shadow to the type characters. You must use the actual font that you want to print.
Graphic Components
Be sure to send all graphic components that are in your job. This includes “Nested files” that are within eps files. Do not “Stylize” graphics in QuarkXPress or any layout program (such as negative, contrast, posterize, ghosting, etc). These should be done in the native application. As should any colorizing especially when using Adobe PageMaker.
Are line-art, grayscale and 4/C files scanned at the appropriate resolution and dot value?
Line art should have a resolution of no less than 800dpi. Grayscale and 4/Color should have a minimum resolution of 266dpi or double the line screen used. Try to scan your images so they can be placed in the document at 100%. 4/Color scans should have a minimum ink density of 4% cyan, 2% magenta, 2% yellow, and a maximum ink density of no more than 290. Halftones should have a dot of no less than 4% highlight and no more than 90% shadows. They should not be placed any larger than 125%, or smaller than 30%. If your images are to be scanned by California Offset Printers – indicate Page, Cropping and Scaling on each scan.
Proper file format
Save scans as Tiffs whenever possible, and use Photoshop to save your scans. Photoshop writes cleaner Tiff files than programs that come with desktop scanners. Do not save as RGB. Save your images in CMYK, or convert them before sending the job to us. Save EPS files as a single file not as a DCS file. Do not use LZW compression on TIFF files. Do not include the Transfer Function or Halftone Screen, Do Not use JPEG Compression. When using silhouettes with clipping paths, make sure to save as EPS files with the path saved with a flatness of no less than 3.
When using Illustrator eps files do not include the printer default screen in the document setup.
SPOT and CMYK colors
If your job is printing in CMYK, be sure to convert any Spot Colors. This is especially important in illustration programs such as Illustrator and Freehand. You should not have any spot colors in any of your files UNLESS they are actually printing a spot color ink. Use only Pantone, Trumatch, or Custom 4/C CMYK colors only. Never use RGB, HSL or any other non standard color models. Delete any unused colors.
Naming Files
Name your files logically. Limit your file names to as few characters as possible. Leading and trailing spaces should not be used. Never name two files or images the same, even if they are on different pages.
Bleed
Any element that extends to the final trim edge needs bleed extended to at least .125″ (1/8″). Do not include the bleed when setting up your document size. Bleed should be opened up past the edge of the document. All live matter must be at least 3/8″ from trim.
Trapping
COP implements automatic trapping. If you do not wish for California Offset Printers to trap your files please notify your Account Representative and or you Customer Service Representative.
Do not depend on an applications default setting to trap properly. Print out color separated lasers to check your traps, composite lasers do not show trap correctly. California Offset Printers can not be responsible for documents trapped improperly.
Document Layout
Always make your document to final trim size.
Please see: Publication Sizes & Decimal Equivalents
Documents should be broken down by form whenever possible.
Do not send single page documents, it is very time consuming to process them. Try to keep documents to 8 pages or more.
Please See: Imposition Guidelines
Always lay out your document as single pages in readers order, never printers order.
Sending in your files
Option 1 – FTP – get login now
Option 2 – Passport – get login now
Option 3 – Disk
All disks must be labeled clearly and be accompanied by a directory print-out.
If any files such as scans that we create are to be sent back to you a disk should be sent in for them to be loaded on.
We accept the following types of media:
Iomega Zip
Iomega Jaz 1&2 Gig
Syquest 44-200 meg
CD-ROM
FTP Instructions for Uploading Digital Files
Customer File Procedure
- Request FTP login – click here
- Compress all Native files into a single archive in Stuffit (.sit), Binhex (.hqx) of ZIP (.zip) format.
- PDF’s do not need to be compressed
- Remove all spaces in the name of the compressed archive
- Confirm upload with an email to your CSR at csr@copprints.com
PC Users:
You can upload and download using IE 5.5 or IE 6. Note: IE7 users please use Windows Explorer for Windows XP.
- Enter the following – ftp://ftp1.copprints.com into your browser.
- Login
- Drag files or copy and paste files into IE browser window to upload.
- Most FTP clients for PC are compatible as well.
Mac Users:
Note: Internet Explorer, Safari, Netscape for OS9 & OSx do not support uploading to FTP.
• OS9
Fetch version 3x is the most common FTP client used on OS9. WS_FTP and other FTP clients are compatible as well.
• OSx (Jaguar, Panther, or Tiger)
Free FTP Client called RbrowserLite is available at http://www.rbrowser.com/download.html
Fetch 4x or Transmit are examples of other options that OSx users have available.
Using FTP Client for PC or Mac
- Enter Host (or server) name: ftp1.copprints.com
- Enter your User ID (Login) given to you by COP Customer Service Rep.
- Enter your password given to you by COP Customer Service Rep.
- Leave Port to Default (21)
- Leave PASV mode on.
- Once logged on, you should not see any folders unless you or someone from your company have uploaded files at a previous time.
- Drag your folder containing PDFs or the compressed native files into the ftp window of ftp client.
Note:
Typing ftp.copprints.com will NOT allow you to logon. This is used only for COP employees.

